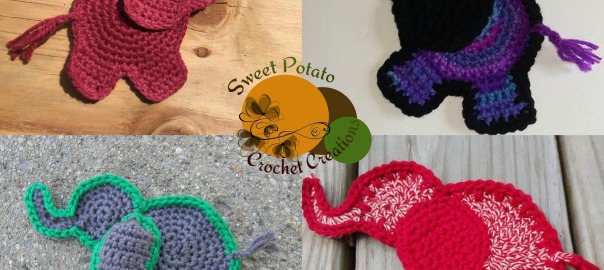
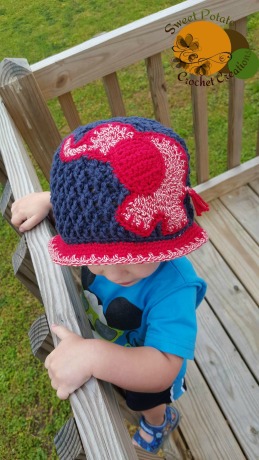
This Happy Little Elephant Applique came about on request from my son. His old sunhat was getting too little for him and he wanted a new one. His request: A blue sunhat with a red elephant! For 2.5 years old, the kid sure does know what he wants! So I sketched how I wanted the elephant to look, we went to Hobby Lobby to pick out his colors of cotton, and he helped me pick out a stitch for his hat. Here is a photo of the final hat. Aidan’s sunhat is available in my Ravelry store and comes in sizes baby all the way up through adult! You can get it for 50% off through April 30th, 2016. However, the elephant applique I used on his hat will be available here for FREE!
To save and favorite this pattern, head on over to Ravelry!
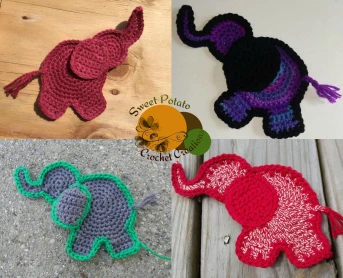
Happy Little Elephant Applique
Materials Needed:
- 30 yards of worsted weight yarn in one or more colors
- G hook
- Scissors
- Yarn needle
- Stitch marker
Gauge: Not necessary for this project
Stitch Glossary: MC-magic circle, Ch-chain, Sl st-slip stitch, Sc-single crochet, Hdc-half double crochet, Sc dec- single crochet decrease.
Notes:
- Body and head are worked in continuous rounds. Use a stitch marker if necessary to keep track of stitches.
Body:
Round 1: MC. Place 6 sc in the mc. (6)
Round 2: 2 sc in each st around. (12)
Round 3: *2 sc in the next st. Sc in the next st.* Repeat from * to * around. (18)
Round 4:* 2 sc in the next st. Sc in the next 2 st.* Repeat from * to * around. (24)
Round 5: *2 sc in the next st. Sc in the next 3 st.* Repeat from * to * around (30)
Round 6: *2 sc in the next st. Sc in the next 4 st.* Repeat from * to * around (36)
Round 7: *2 sc in the next st. Sc in the next 5 st.* Repeat from * to * around. (42)
Do not fasten off. Go to the tail.
Tail
Starting where you ended off on the body, sl st into the next st. Ch 3. Fasten off. Take 3 small pieces of yarn about 3 inches long and attach them through the last ch on the tail like you would fringe. Trim to desired length.
Note: If using contrasting yarn for tail fringe weave in the end left from tail before adding.
Head
Round 1: MC. Place 6 sc in the mc. (6)
Round 2: 2 sc in each st around. (12)
Round 3: *2 sc in the next st. Sc in the next st.* Repeat from * to * around. (18)
Round 4:* 2 sc in the next st. Sc in the next 2 st.* Repeat from * to * around. (24)
Do not fasten off. Go to the trunk.
Trunk
From where you ended on the head, ch 9. Sc in the 2nd ch from the hook. Sc in the next st. Hdc in the next 2 st. 3 hdc in the next 2 st. Hdc in the last 2 st. Sl st to the next st on the head. Fasten off.
Attaching the Body to the Head
Figure out where you would like the tail to be on the elephant. Place the head piece on the body, overlapping the 2 pieces just a little bit (one row max). Adjust the head to have the trunk of the elephant positioned how you like. Sew the head onto the body.
Legs
Leg 1
Count 7 st down from the bottom of the head where it connects to the body.
Row 1: Join with a sc. Sc in the next 4 st. Turn.(5)
Row 2-3: Ch 1. Sc in each st across. Turn. (5)
Row 4: Ch 1. Sc in each st across. (5) Fasten off.
Leg 2
Skip 2 stitches from the first leg.
Row 1: Join with a sc. Sc in the next 4 st. Ch 1. Turn.(5)
Row 2-3: Sc in each st across. Ch 1. Turn. (5)
Row 4: Sc in each st across. (5) Fasten off.
Body border:
With contrasting color
With legs facing away from you, attach your yarn to the top left corner of the second leg (left leg). Sc around the whole elephant. When approaching the tail that is hanging off the side, pull the tail toward you and continue to sc behind it. When reaching the trunk, only sl st around the trunk, then continue to sc after the trunk is finished. Join to the first sc. Fasten off leaving a long tail to sew the elephant onto any project desired.
Ear
With contrasting color
Row 1: Ch 6. Sc in the 2nd ch from the hook and each ch across. Ch 1.Turn(5)
Row 2: 2 sc in the first st. Sc in the next 3 st. 2 sc in the last st. Ch 1. Turn. (7)
Row 3-6: Sc in each st across. Ch 1. Turn. (7)
Row 7: Sc dec over the first 2 st. Sc in the next 3 st. Sc dec over the last 2 st. Ch 1. Turn. (5)
Row 8: Sc dec over the first 2 st. Sc in the next st. Sc dec over the last 2 st. (3)
Do not fasten off. From here, sc around the entire ear. Join to the first sc. Fasten off, leaving a long tail to sew onto the elephant. Weave the tail to the top left of the ear (opposite end of where you fastened off. Figure out the placement you like for the ear. Begin sewing the ear onto the head and body, Continue sewing around the ear and connecting it to the body. When reaching the part of the ear that hangs off of the body, fasten off and weave in the ends. The part of the ear that hangs off of the body will only be sewn when you attach the full applique to a project.
Finishing:
Weave in any remaining ends (except the one needed for sewing the applique onto a project) If desired, sew an eye onto the elephant. I personally chose not to have an eye on mine, but I know some people want their animals to have eyes 🙂
***My testers and I have worked diligently to make this pattern for you. Rewriting, reselling, distributing, or copying this pattern as your own and/or without my consent is prohibited. You may sell any finished items from this pattern. However, I do ask that you credit me as the designer and link back to my Facebook page www.facebook.com/sweetpotatocrochetcreations or my Ravelry page http://www.ravelry.com/designers/sweet-potato-crochet-creations
I hope you enjoy this Happy Little Elephant Pattern!